#Add option to set image
Explore tagged Tumblr posts
Visit Tumblr Blog
Explore Tumblr blogs with no restrictions, modern design and the best experience.
Last Seen Tumblr Blogs


Fun Fact
The Tumblr app for Google Glass was released on May 16, 2013.
Text
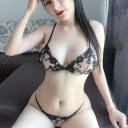
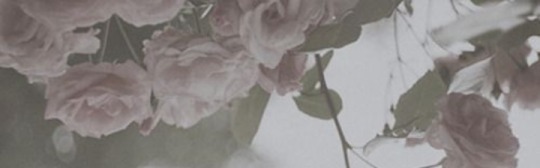
Heyyyyyy @betweenblackberrybranches did you know that I like your automatons designs a lot?
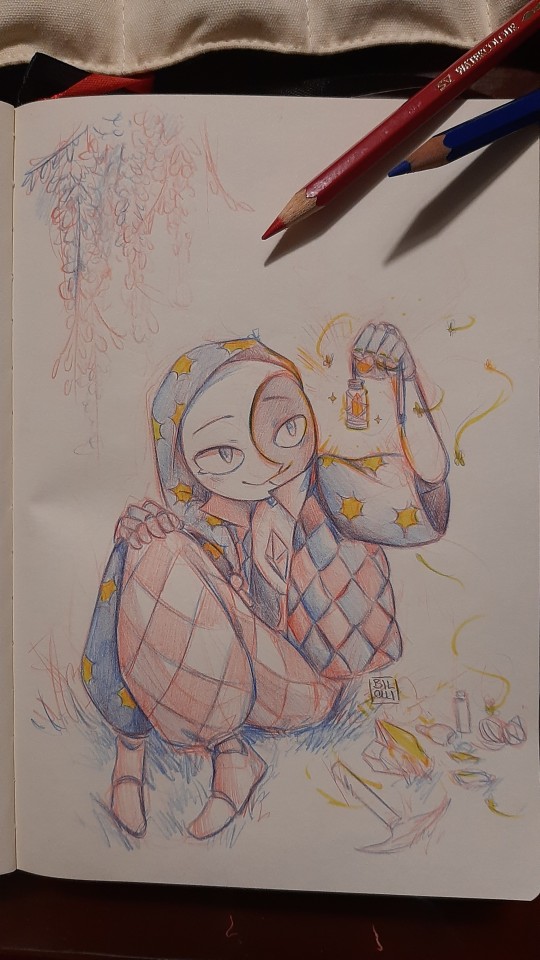
Scans under the cut
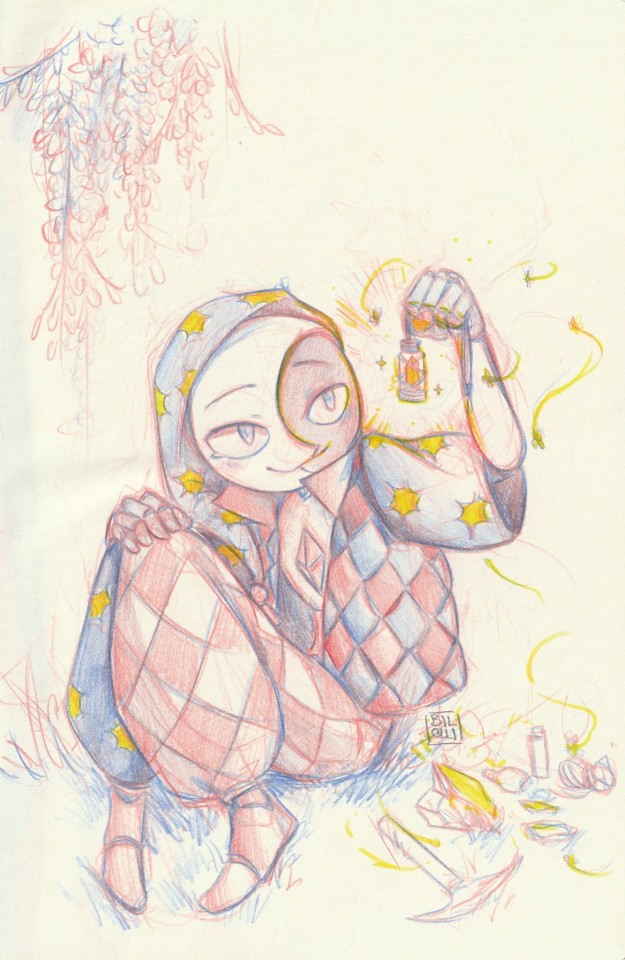
#2 versions because yesterday I found out my scanner has two options to scan differently#mind blown#the first is the “photo image” setting and it's more like what it looks in my sketchbook#the second is the “document image” and it changes the color of the paper to white...and adds a lot of contrast too lmao#rambling#automatons au#obv moon because the guy had issues tm and I'm here for that#and because i might have a preference#but don't tell sun lol#i wonder what he's gonna do with that little pendant? is it a gift for someone? *WINK WINK*#ok i'll shut up now#bilolli's art
442 notes
·
View notes
Text
The meaning and symbolism for this artwork (by me):

(TW brief discussion of disassociation)


The ants:
* The main inspiration for this artwork was ant spirals, (this is where ants get stuck in a loop following each other until they die).
* I wanted to relate this imagery to my current life and the up and down cycle of my mental health
* The phrase "this time will be different" is something I think to myself whenever there is a change in my life
* In this artwork the wording strongly contradicts the images of a never ending spiral. It's a false mantra- and holds no weight compared to the impending reality.
The raspberries:
* This part is pretty personal, so I won't be going into too much depth, but to summarise: the raspberries symbolise my childhood and things l've lost to the past. My grandparents had raspberry and blackberry bushes in their garden. I remember picking them with my brother and cousins. A lot has changed since then, so it's a time I wish I could go back to.
* I gave it the white border to represent a stamp/ postcard as if it is a location I could travel to.
* The setting of a large field gives the option of going in any direction but the figure cannot move forwards by being trapped in the past


The string:
* "How long is a piece of string?" I decided to add the string to show the uncertainty of how long the spiraling feeling will last. There is no real answer.
The human figure:
* A representation of me. I often have feelings of not being real. Like I forget I'm a real person that people can perceive. This lasts for various lengths of time- sometimes hours, sometimes months. It can be really jarring when you snap back to reality or feel yourself fading away again.
* I chose a male figure (despite me being female) to further emphasise the disconnect I feel with myself in these moments.
* The head of the figure is a different colour to the body to show that it is completely empty. The body is there but the mind is not.
Overall, I wanted this artwork to convey across the feelings of helplessness and disconnect I feel when stuck in a self made cycle. The phrase "this time will be different" is intended by me to be desperate and pessimistic. However, it can definitely be viewed as hopeful and a way to break the downward spiral. It’s up to the viewers interpretation.
#my art#artists on tumblr#art#digital art#artwork#draw#drawing#artist#surrealist art#illustration#art analysis#analysis#symbolism#weird art#art essay#animal art#fantasy art#original art
2K notes
·
View notes
Text
There is no 'imagination'.
Someone needs to tell you this but everyone is too busy struggling between the two so I'll do it. Reality is the only thing that exists. It just exists differently in different planes.
In the 4D we call it Imagination but honestly it's not really something we're 'imagining', it's reality somewhere out there. IT IS reality in your head as well even if you don't believe it.
When you 'imagine' something you're not making it up. Creation is already finished. You're choosing a particular reality. A particular thought. A particular outcome. Because everything has already happened. Think of your mind as a dress up game. There are cloth options (thoughts/realities) in different clothing sections (related to the thing you want). You are combining clothes from those sections to get your desired outfit (desire/outcome).
Imagination is what reality is called in the 4D plane. Imagination is a different name for reality. They are the same thing with different names. This is why we can also say that reality is just an imagination or 'everything is in the mind'. Everything was one all along.
This is very different than saying reality mirrors/reflects imagination. Yes imagination exists sure blah blah blah but it's just a different name for reality. It's something that you haven't physically experienced yet. It's not actually in your head in a way that it's not real. Everything in your head is a very real reality in the multiverse. A very real outcome. Just not yours right now in the present (unless you choose it).
I don't think you get it. Let me explain again. Imagination does not exist in a way you think. Your every single thought, the images in your head, your 'fake' scenarios, your 'fake' arguments, literally anything you can think of or feel inside your head is real. Maybe not here maybe not right now. But it is real in a reality 'out there' which is basically just inside your mind, because the mind is the multiverse.
You are choosing the scenario, the thought, the image from infinite realities out there (in the mind) with infinite possibilities. Like you choose a scenario to happen in your dr except here it has already happened. Everything has already happened. That is you connecting yourself to different realities in the multiverse. The mind is connected to every reality that is existing because it exists inside the mind. That's why it's said that you are the universe. Because YOU ARE. Continuosly shifting, changing, choosing from the mind. You are existence.
Before anyone says something dumb like imagination/4D plane is the true reality I'll explain that every plane is a true reality abiding by their own unique set of rules. There is no true reality to you in your perspective except what YOU decide to BE. You exist in every plane. Your existence in every plane abides by it's rules. Unless you decide to change the rules of your existence.
You can be a 1D object. A line.
You can be a 2D object. A map (if you wanna add spice to it then a talking map.)
You can be a 3D object. A ball. (You already are a 3D being.)
You can be a 4D object. A hypercube.
And so much more. Everything is energy. You're probably a rock in a different reality/universe. Maybe a line in a world of paper. Or a talking ball. Or just a ray of light. Come on don't loose focus now. You're the entire universe what else did you expect?
We strayed a little from the topic here but like I was saying the mind is like a place where every single reality has a tea party. What you don't experience physically doesn't mean it didn't happen. In the mind reality is faster. Because everything is happening right now. The physical plane has a slow moving energy so we can 'experience' our life. Like I said everything happens a little different in different planes.
Everything is a reality (or different universes). It's like reality (you) in a reality (physical plane) which you can mould to your will because you are the reason why it (reality) exists. You are existence itself. Pure awareness experiencing the experience that already exists in you. Your mind. The void.
There is no innerman or outerman you're literally both. One's literally a different name for the other and vice versa. Stop looking for the middle ground when you are the middle ground. You are reason they even exist. Why? because only you exist. Everything that exists is the same thing which came from you with different forms, different names, different energetic pattern, different rules for each of them. That's why everything is connected.
Different realities are creating a reality you're currently living. Your own reality is a mix of many combined together moment after moment so you can experience things in the physical plane.
The reason imagination was even popularised as something that creates reality is because people thought that to experience something we have to 'imagine' it first. But they're wrong. They were doing the right things but intercepting it wrong. We don't imagine anything. We live it the moment we even think about it. Everyone is understanding it now. Imagination is not reality. Nothing was ever imagination in the first place. Everything inside your head was always real.
Reality is fluid. Human beings are fluid. They are both free flowing energies. We pass through different realities the same way different realities pass through us at every moment. Remember folks, shifting is your nature.
Everything is and will always be a reality existing in the multiverse.
Let me decode some popular quotes for you to understand.
- The universe is mental.
Meaning: Everything exists is in the mind because every reality exists where it was created by pure awareness, hence the mind. Realities are expanded outwards through us, chosen from pure awareness experienced through the heart (the knowing/feelings) which exists in your physical body. Which further exists in the mind because it was also created by pure awareness.
Confusing? Well because pure awareness, the mind, realities and us are the same thing expressed in different ways. Like I said everything is connected.
- As within, so without.
Meaning: This one is quite obvious. What we see on the outside of us is also inside of us. I explained all that in this post and my reality is YOU post already.
There is no imagination. Reality has always been the only truth.
I've been working on this post for 2 days hope y'all understood atleast a little. I'm super tired can't wait to just pass out right now. Ignore any typos please and feel free to ask any questions!
#1k special#shiftblr#reality shifting#shifting#shifting blog#shifting community#shifters#shifting antis dni#shifting reality#shifting realities#shifting consciousness#loa manifesting#loass#loa tumblr#loablr#loa blog#loassumption#manifestation#manifesting
1K notes
·
View notes
Note
HIIIIIII!!!! sorry if this is like a stupid ask lol, but could you do a stamp tutorial? your stamps are always so high quality oml, how do you resize your gifs and images???


HIIII and no worries, I can totally make a stamp tutorial! (⌒▽⌒)
I’ll be going through on how to make a normal image stamp and then a gif stamp. By following these two tutorials, you’ll be able to make stamps just like these!


PROGRAM USED ★ Ibispaint
STAMP TEMPLATE BY ★ AHMED-ART on Deviantart.
To start off, you must find an image you’d like to make into a stamp. Then, find a stamp template you think would pair well with your image. There are many different types of stamp templates out there and you can find a lot of them on Deviantart.
Make sure to read the terms of use for the template before using though! Here is the template I will be using for this tutorial.

Making stagnant stamps is easy once you got the steps down. You can use any art program and follow a similar process, but I only use Ibispaint to create mine.
First, create a canvas that is the same width and height as your stamp template. This one is 97x57. Most stamp templates have super similar proportions. If you are unsure of your stamps dimensions, you can create a 100x100 canvas then crop it around the stamp template once you have inserted it.
(Brush icon -> Canvas button -> Trim)
To get higher quality on the image inside your stamps: the closer the better! For example:


See how the first stamp’s image is rather far away? This makes the quality appear much lower. However, once you zoom in, it becomes higher! So I recommend finding images to create stamps out of that you are able to zoom in on so the quality can pop.
You’ll need to erase the parts of the image that don’t fit inside the stamp so it remains transparent around the border.
If you want to change the border color of the stamp, fill in the canvas with the color you want. Then, clip it to the stamp border. Lastly, go and set it on multiply. This will change the stamp borders color!

If you want to put a line texture on your stamp, you can utilize the ruler tool in Ibispaint to draw lines over your stamp.

I’ll add these every once and awhile to my stamps for fun. If you set the opacity of the lines to 10%, it’ll end up looking something like this.
And that’s the completed stamp!
Changing the border color and adding the line texture is completely optional, though it’s always fun to customize stamps!

PROGRAMS USED: Ibispaint, Ezgif
GIF stamps are a little trickier, but the process is not too difficult once you got it down!
First, find a gif that you would like to make into a stamp. I’ll be using this one!

if you want to have a different colored or customized stamp border, you must edit it on Ibispaint before like explained above.
You can combine the layers and save them transparently so it’ll end up looking something like this.

I made this one blue and added a gradient to it to match the gif I want to make into a stamp! You can add a gradient to the border by adding a darker color onto the multiply layer then using an airbrush to blend both colors together in the middle on both sides of the template.
Now, open up Ezgif and click the tab called Crop. Then, insert your stamp template there. The way I find the dimensions of the inside of the stamp is by cropping my way around the inside of the template.
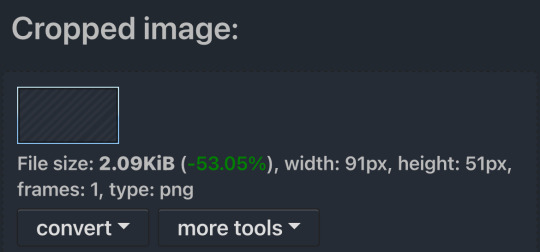
The dimensions inside this template in particular are 91x51. This is what we will resize our gif to! Before we can do that, click the crop tab again at the top of the page to refresh it and then insert your gif. This isn’t required to do, but I like to crop my gifs a bit so they focus more on what is going on inside my stamp. Like I said before, the closer the better, as it will make the quality higher!

Now that we have our cropped gif, click the tab called resize at the bottom of the page. The dimensions of the inside of this stamp are 91x51, so insert those numbers in the width and height boxes to then resize the gif.

Next step is to click the overlay tab at the bottom. You will need to click the button that says “extend canvas size” so we have room to overlay the stamp template on top of the gif. After extending the size, upload the stamp template as an overlay where it says choose file.

On computer, after clicking upload image, you can just drag the stamp template over the gif and situate it. However, you can also figure out the number coordinations to fix the template ontop of the gif by messing around with it a bit. I make my graphics on my phone so I use the numbers instead of dragging.

Left means to move the template left or right depending on the numbers you insert. Top moves the template up or down. The left for this template is 42 and the top is 21. It takes a bit of messing around to find the exact numbers.
Now that the template is ontop of the gif, all that is left to do is to crop the space around it. Click the crop tab again at the bottom of the page and then click where it says “trim transparent pixels around the image.” This will easily crop the extra space around the stamp.

Click download to save your gif and that’s it! Here is the finished product!
The whole process for making gif stamps is always the same, the only things that can vary or change are the dimensions of the gif (so it can fit inside different templates) and the left/right.
I hope you find this tutorial helpful and if anyone needs anything else explained, let me know. These stamps are free to use if anyone would also like to use them.
Happy stamp making everyone! 🩷
Dividers (c) @coco-coquette

#tutorial#web graphics#graphics#webcore#old web#rentry#stamps#web decor#gif stamps#alien stage#alien stage till#strawpage#spacehey#ᯓ ᡣ𐭩🐚asks
739 notes
·
View notes
Text
========================================================
[tutorial: build your own neocities/nekoweb page]
========================================================
a beginner's guide for making your very own home on the indie web—retro, personal, weird, and 100% yours.
this ain’t an average wix, squarespace, or tiktok aesthetic.
we’re talking full html/css with soul and attitude.
[ prerequisites ]
------------------
> an idea
> basic text editor (vscode, notepad++, or even notepad)
> account on https://neocities.org or https://nekoweb.org
> some gifs or tiles you love (dig deep or make your own)
> optional: image host or gif repo (or self-host everything)
[ feeling overwhelmed? read this. ]
-----------------------------------
you do *not* need to know everything.
html is not a mountain. it's a garden.
you plant one tag. then another. then a style. then a button.
you can build your site piece by piece.
and every piece is a portal to somewhere personal.
you are allowed to make broken pages.
you are allowed to use templates.
you are allowed to start over as many times as you want.
this is *your* world. you control the weird.
[ step 1: create an account ]
-----------------------------
> neocities: https://neocities.org
> nekoweb: https://nekoweb.org
register a name, log in, and enter your file manager.
this is where you upload your files and see your site live.
[ step 2: your first file - index.html ]
----------------------------------------
make a new file: `index.html`
basic starter:
<html>
<head>
<title>my weird little corner</title>
<link rel="stylesheet" href="style.css">
</head>
<body>
<h1>welcome to the void</h1>
<p>this is my page. it’s strange. like me.</p>
<img src="mygif.gif">
</body>
</html>
> upload to the dashboard
> boom. you’re live at
https://yoursite.neocities.org
or https://nekoweb.org/u/yoursite
[ step 3: add a style sheet - style.css ]
-----------------------------------------
create a file called `style.css` and upload it.
here’s some nostalgic magic:
body {
background: url('tile.gif');
color: lime;
font-family: "Courier New", monospace;
text-shadow: 1px 1px 0 black;
}
img {
image-rendering: pixelated;
}
marquee {
font-size: 20px;
color: magenta;
}
link it in your html and the vibes activate.
[ step 4: decorate it like a haunted usb ]
------------------------------------------
> use <marquee> for chaos scrolls
> embed gifs from https://gifcities.org/
> steal buttons from https://cyber.dabamos.de/88x31/
> set up a guestbook at https://www.smartgb.com/
> loop audio with <audio autoplay loop>
> add fake errors, 90s web lore, random link lists
[ step 5: resources, themes, and comfort ]
------------------------------------------
> templates & layouts: https://numbpilled-themes.tumblr.com
> glitchy gifs & buttons: https://glitchcat.neocities.org/resources
> layout builder: https://sadgrl.online/projects/layout-builder/
> free tiled backgrounds: https://backgrounds.neocities.org/
> beginner html intro: https://www.w3schools.com/html/
> pixel fonts & cyber assets: https://fontstruct.com/
remember:
you don't need to know js. you don't need to be a coder.
you just need a mood, a direction, a dream.
the html will follow.
[ bonus concept: shrine pages ]
-------------------------------
> a page just for one character you love
> a room to house digital fragments of your identity
> embed quotes, music, images like altars
> call it shrine.html and link it from your homepage
[ closing mantra ]
------------------
you are not here to be optimized.
you are not a brand.
you are a ghost inside the machine,
carving your initials into the silicon void.
welcome to Your website.
========================================================
#webcore#old web graphics#neocities#web graphics#carrd graphics#carrd resources#rentry decor#rentry graphics#carrd moodboard#carrd inspo#neopets#indie#indie web#early web#webdevelopment#web development#web resources#web design#old internet#old web#oldweb#nekoweb#transparent gif#tiny pixels#pixel gif#moodboard#tutorial#html page#html theme#htmlcoding
435 notes
·
View notes
Text
KIP'S BIG POST OF THINGS TO MAKE THE INTERNET & TECHNOLOGY SUCK A LITTLE LESS

Post last updated November 23, 2024. Will continue to update!
Here are my favorite things to use to navigate technology my own way:
A refurbished iPod loaded with Rockbox OS (Rockbox is free, iPods range in price. I linked the site I got mine from. Note that iPods get finicky about syncing and the kind of cord it has— it may still charge but might not recognize the device to sync. Getting an original Apple cord sometimes helps). Rockbox has ports for other MP3 players as well.
This Windows debloater program (there are viable alternatives out there, this one works for me). It has a powershell script that give you a little UI and buttons to press, which I appreciate, as I'm still a bit shy with tech.
Firefox with the following extensions: - Consent-O-Matic (set your responses to ALL privacy/cookie pop-ups in the extension, and it will answer all pop-ups for you. I can see reasons to not use it, but I appreciate it) - Facebook Container ("contains" Meta on Facebook and Instagram pages to keep it from tracking you or getting third party cookies, since Meta is fairly egregious about it) - Redirect Amp to HTML (AMP is designed for mobile phones, this forces pages to go to their HTML version) - A WebP/AVIF image converter - uBlock Origin and uBlacklist, with the AI blacklist loaded in to kill any generative AI results from appearing in search engines or anywhere.
Handbrake for ripping DVDs— I haven’t used this in awhile as I haven’t been making video edits. I used this back when I had a Mac OS
VLC Media Player (ol’ reliable)
Unsplash & Pexels for free-to-use images
A password manager (these often are paid. I use Dashlane. There are many options, feel free to search around and ask for recs!). There is a lot that goes into cybersecurity— find the option you feel is best for you.
Things I suggest:
Understanding Royalty Free and the Creative Commons licenses
Familiarity with boolean operators for searching
Investing in a backup drive and external drive
A few good USBs, including one that has a backup of your OS on it
Adapter cables
Avoiding Fandom “wikias” (as in the brand “Fandom”) and supporting other, fan-run or supported wikis. Consider contributing if its something you find yourself passionate or joyful about.
Finding Forums for the things you like, or creating your own*
Create an email specifically for ads/shopping— use it to receive all promotional emails to keep your inbox clean. Upkeep it.
Stop putting so much of your personal information online— be willing to separate your personal online identity from your “online identity”. You don’t owe people your name, location, pronouns, diagnoses, or any of that. It’s your choice, but be discerning in what you give and why. I recommend avoiding providing your phone number to sites as much as possible.
Be intentional
Ask questions
Talk to people
Remember that you can lurk all you want
Things that are fun to check out:
BBSes-- here's a portal to access them.
Neocities
*Forums-- find some to join, or maybe host your own? The system I was most familiar with was vbulletin.
MMM.page
Things that have worked well for me but might work for you, YMMV:
Limit your app usage time on your smartphone if you’re prone to going back to them— this is a tangible way to “practice mindfulness”, a term I find frustratingly vague ansjdbdj
Things I’m looking into:
The “Pi Hole”— a raspberry pi set up to block all ads on a specific internet connection
VPNs-- this is one that was recommended to me.
How to use computers (I mean it): Resources on how to understand your machine and what you’re doing, even if your skill and knowledge level is currently 0:
This section I'll come back an add to. I know that messing with computers can be intimidating, especially if you feel out of your depth. HTML and regedits and especially things like dualbooting or linux feel impossible. So I want to put things here that explain exactly how the internet and your computer functions, and how you can learn and work with that. Yippee!
851 notes
·
View notes
Text


Primavera: All in One Page #01 by @pneuma-themes
Always, it's spring, and everyone's in love, and the flowers pick themselves.
Live Preview / Get the code: [Pastebin] / [Github]
Another Twitter inspired layout. This is an all-in-one page with about, blogroll, tags, and FAQ sections. The code has been heavily annotated, so please go through the code first before sending me an ask!
Important note: Your blog must have been given permission to use Javascript on pages. As of 2024, the waiting time is almost indefinite, and thus might necessitate a circumvention. You can refer to the post I linked to find the how-to.
For the blogroll to display the list of blogs you follow, you must enable this option on the blog setting:

This will not work on secondary blogs, as they do not have that option on their settings.
Features:
Five custom links
Everything is customizable, from the icons to the content and the colors. Customizable options can be found on the :root section of the CSS.
A built-in light-on/off mode that can be toggled by one click.
A header image. The size of your header image is 60% of your screen width x. 250px. The image should resize automatically.
An endless space for practically every section. You can be as detailed or as concise as you like.
Sticky navigation tabs.
A short "currently" tab in the about section, can be about anything you like.
This is a page theme, so blog posts will not be displayed. Please install this through the Add new page link instead.
Credits:
Icons: @alydae
Header: @tofuvi
Fonts: Merriweather, Albert Sans @ bunny.net
Font icons: Dencar Icons (ported by @glenthemes)
CSS tabs: bulma.css, functionality adapted from this StackOverflow post.
Tooltips: tippy.js
Please like and reblog if you like or are using this!
501 notes
·
View notes
Text

Made a template for Infamous MCs :) (works like a dress up game!)
Feel free to customize/edit whatever you want!
I used this game by @ummmmandy for the MC picture (with some edits eg. jewelery)!
More instructions/info below
! If you play look at it on mobile hold your phone horizontally or you can't see most of the image lol.
Choose the notebook first and set your stats after that (for ease). The stats start at 10 percent and increase in steps of 10. Rounding up or down is up to you.
I think it's easier to fill in the "open questions" by saving the picture and just adding text on your device's picture app but I did add in letter options in case you don't want to do that lol.
Cut off the bottom part with the stat options list in your gallery too! It's just there as a reminder but you don't need to stick to it of course! <3
If you have any questions or are desperately missing an option let me know!
MORE CUSTOMIZATION?
Hope you have fun if you try it :)
(You don't have to tag me or anything like that. You can! and would love to see what you made but it's not required)
Download the psd here (Google Drive). One is my file for editing (Notebook_Detail) so thats the most detailed but not quite as organized as the Dress up file (Notebook_Meiker). Use both/either as you like!
Fonts used
Undertown - for the backstage pass
Burst My Bubble - body notebook neat
SP Marker - headings notebook neat
Moon|lime - body notebook messy
Clint Marker - headings notebook messy
For the text messages I used TW Cen MT, but that's a more default font (at least it was already installed).
#and thank you to iamweretoad for the idea!!#I know there's lots of templates out there but this one is very infamous specific.#The pass on the lanyard is the backstage pass the MC wears in the prologue!#infamous if#interactive fiction#Character template#infamous oc#Meiker.io#🌷#i.... made up all the info for this person on the spot i have nottt played with a character like this but i did want to...
307 notes
·
View notes
Text
how to grub your karkat
or you can use this for any other plush or if you wanna make a whole new plush entirely or whatever

disclaimer im not a professional in any sense of the word and theres anything technical im doing wrong or you think you can do it better by all means dont hold back
Things you’ll need
sewing machine unless youre really dedicated but doing it by hand is gonna be an agonizing feat i promise. I just used a straight stitch for everything
Fabrics: for the main body i suggest a minky or something soft, for the inner lining something in the same color as the main body and ideally with some stretch, and anything black for the legs. Less than a yard of each will do
if youre using minky or anything furry get a lint roller. Trust me
stuffing, i used polyfil
threads that match your fabrics
good fabric scissors
sewing needle for hand sewing/fixes
karkat plush (optional)

Heres the pattern i came up with! They are numbered for your convenience and pieces with the same numbers are going to be part of the same row of segments. cut everything out on the black lines (Make sure when you’re printing to fit the image to the page size.) on the left we have the belly pieces, the right is the main body, and we have the foot in between
Im using a relatively thin minky fabric, im sure you can use whatever but something with some fluffiness kinda helps to mask any imperfections in the sewing. When drawing out your patterns keep in mind what direction your fibers settle in and try to keep it consistent
On the wrong side of the fabric measure out at least a half inch seam allowance around each piece of the pattern, i used a centimeter and that worked but had me sweatin a bit.

For the main body pieces fold your fabric in half before you cut so you can have 2 of each segment that are mirrored to each other, i also extended all of the #1 pieces an additional centimeter/half inch at the top so we can fold them over at the very end. I highly suggest numbering the insides of all the cut pieces, especially in a way where you will remember what direction they are each meant to sit

After you’ve numbered all your pieces, set them aside and start making your feet!
Each of the 6 legs is made of two pieces, but i because i only had a swatch of the black minky i made up for the rest with some random black scrap fabric from an old project. Try to keep your fabric consistent if you can lol
I didnt give these pieces any more seam allowance on the fabric but i recommend adding a centimeter or half inch to the base of it to extend the length and have some more wiggle room

like so
Instead of cutting out 12 individual pieces and struggling to stitch them all together i started with 6, then pinning each piece real tight with the right/furry side down onto my secondary fabric, and slowly stitching around the shape real close to the edges- DO NOT CLOSE THE FLAT SIDE as we are going to stuff the feet through here

Now cut the shape out of the fabric and repeat till you have 6 feet

Now flip those bad boys inside out, stuff up, and if you wanna you can match them to their best pairs

now grab a pair of feeties and your #1 pieces and line them up, in this picture my belly #1 piece is shorter bc i forgot to add the extra centimeter and i recut that once i realized. Line those sides up with the right/furry parts touching and with the feet in between, flip it around to make sure everything's sitting the way you want it

Note. i didnt realize until later but i sewed my feet in upside down. save yourself the time it takes to fix it and dont make the same mistake
Straight stitch these layers together and repeat with the next two segments our good friends #2 & #3

Repeat this for the #2 and #3 sections but NOT THE #4, that part doesnt need feet! just line those edges up right/furry sides together and sew


the secret to the squish of the suit is making this inner lining from another fabric and stuffing it! I used what i had leftover from a stretchy red fabric for a kanaya skirt. For this we need to make a new pattern for each section, making sure it follows the curve of the round edge but the piece itself is shorter, almost like youre removing the seam allowance you added. Mine is a centimeter shorter on the top and on the bottom and reaches to the middle

Make one of these for each numbered segment,you only need to make half the pattern and you can fold your fabric in half on a crease and you end up with one symmetrical piece (bars)

Now you need to pin these pieces right on top of the wrong side of your numbered furry sections and line up the straight edges like so (disclaimer for LOTS OF SCARY NEEDLES !!)

Admittedly i didnt estimate how long these pieces needed to be very accurately and overshot it a bit, if you start pinning it from the middle and continue outwards on either side thatll ensure its not too lose and you can cut off any excess after
The only exception is piece #1, if you recall we gave this #1 section extra seam allowance. This is so we can sew down that excess at the neck later and hide any of the inside that might show once its all put together. Do not connect the top edge to the inner lining! Since i added an extra centimeter earlier im gonna leave that hanging and pin + sew down the inner lining a centimeter lower than the top edge. LEAVE THE CURVED EDGES OPEN! DONT SEW THEM TOGETHER! those stay open to stuff

Straight stitch the lined up edges together

Now you have all these skinned pieces of little freak and we need to connect all these segments together making sure to sew UNDER the existing stitches so we dont see those on the outside when its all put together


Inside looks like a bit of a mess but thats fine bc its not the part that matters
Now stuff it! you might need a stick or pencil or something long and thin to get stuffing into the middle bits

Now thats its stuffed you can finally close those curved edges. Try not to sew over a thick mound of stuffing, push it in a little further to give yourself some space and you can fluff it back out after everythings closed. I cut off that excess lining fabric after sewing

Ough… they filleted my boy…
Finally, match up all the edges and lines and HAND SEW them right sides together. You will destroy your machine trying to work around that stuffing i promise. You also have an excuse to get up from your work desk and sew on a couch or smth. I used a standard backstitch for a tight finish and again, make sure you sew under any existing stitches so they arent visible on the outside!

Speaking of the outside, once you stitch everything together you can very gently flip this sucker inside out

This is @hatamonu’s cat Cocaina, aka Coco. Her perfectly square figure made it into my grub files somehow so shes essential to the tutorial

Check the fit and all thats left to do is roughly baste stitch down that excess neck fabric onto the stuffed lining and youre set! I gave the thread slight tugs as i went to tighten the opening a bit put dont tighten it too much

tadaaaaa

It fits pretty snug but starts to slip a bit with motion. Heres a bounce test

If you do shake your baby make sure to safety pin the plush to the suit so he doesnt prematurely shed his exosekeleton
Now spread that baby fever and show your baby to the world


pics from the ALA 2025 homestuck meetup and supplied by para.dox.cos
Tysm for coming along this ride with me especially if you followed the prototype journey on twitter, much thanks to my more sewing savvy friend for the solution to my grub dilemma and for helping me design and build my dolorosa cosplay <3 much love and hopefully many more homestuck cosplays and meetups to come in the future!
#homestuck#homestuck cosplay#karkat plush#karkat#karkat vantas#cosplay#tutorial#homestuck grub plush#plush pattern#long post#ALA 2025#anime los angeles#dolorosa#the dolorosa#apologies if this is hard to follow or utterly incomprehensible please note i am making shit up as i go and results may vary#feel free to ask any clarifying questions and ill do my best to answer#no i will not be selling these#technically i have more minky left than i know what to do with but the cost would have to justify the pain in the ass it all was to complet#and i dont think anyone will pay that price#send me suggestions of red characters to make plushes out of
426 notes
·
View notes
Text
Best light for streamers without a lot of space.

Amaran is the budget line of video equipment for Aputure. And it is surprisingly solid for the price. You can get knockoff versions of most of their stuff from Neewer or GVM, but if you want something reliable that won't break in a year or two, Amaran is a good medium budget option.
They just released what I am callng the anti-ring light.
The Verge Max.

This is a ring light where they fill in the hole and give you an entire light. You can read a long rant about ring lights here. But the short version is, you don't want one unless you put the camera in the hole and are doing a tight close up of a face.

If you aren't doing a close up of a face (like for a makeup tutorial) then you just have a normal light with a giant hole in it.
You will get no magical benefits from a ring light under any other circumstances.
The reason ring lights are so popular (outside of being a fad), is because they don't take up a lot of space. A lot of people are streaming from their computer desk which is usually up against a wall. And you just don't have a lot of room to set up a proper light with a modifier.

Before now, your best option would be an LED panel (with the hole filled in). This one by Godox is pretty good.

It has a little remote and you can add batteries to make it mobile.
But it is small and in order to get soft light, you have to place it very close to your face or set up two of them. And it might get uncomfortable blasting a small light source into your eyes for long streaming sessions.
This new Amaran light is just as thin as a panel light, but its lighting surface area is like a proper studio light.

And it is round so you will get nice catchlights in your eyeballs (if you care about that).
So you can place it a little farther back or against the wall and distribute the light over a larger area. It won't be as piercing and uncomfortable, and you get flattering soft light.
I realize $260 is an investment. You need to be sure you can make good use of this light. But if you are in cramped quarters and need a proper lighting setup, this is a great option.
Otherwise, if you do have a little space to work with, you can buy the Godox panel (or use any decently bright light you have), and tape a $10 umbrella in front of it.

Don't sleep on umbrellas. They work great. They just spill light all over the place, so you have to be mindful of that.
But I took this photo of Chris with a $10 umbrella.

All you are trying to do is make the light source bigger. You can even put the umbrella on a ring light if you already have one.
Or you can bounce the light off the wall behind your desk. If you have a big white wall, use it as a light source.
The gold standard for video lights is always going to be a COB LED light with a Bowens mount. That last part is important. The mount allows you to attach any light modifier there is.

This Godox is pretty good for an entry level continuous light. I like them as much as Amaran.
And then you can throw an octobox on there at the size of your choice.

It even has a grid to help prevent light spill.
This setup is also great for portrait photography.
The Verge Max comes out in June, but here is a video of it if you have any interest.
youtube
Good lighting is a superpower. You can be using a webcam or smartphone and lighting can improve your image much more than just about anything else.
Because I have to socialize mostly through video chats, I have a little LED panel set up near my computer. Makes a pretty big difference when compared to the regular room lights.


#I cheated a little by leaning forward so the light source would be larger and softer#but still that is quite a difference#wide angle distortion makes my head less sizeable#Youtube
308 notes
·
View notes
Text
Digital Stamp Making Tutorial
Hello, and welcome to the long-awaited(at least on my part) digital stamp-making tutorial from neosprites! I’d like to preface that I learned what I was doing from this tutorial so it may be a bit redundant, but if anything I get a bit more specific. Thank you so much to @graphic--horde for your work, it changed me as a graphic maker. This is gunna be a long post so feel free to bookmark it for later. Now, onto the show!

The frame I will be using for this tutorial (which is the frame I use on 99.9% of my stamps) I found from the above linked post, which I believe is from a creator that OP lost track of. Its inner dimensions are 94x50 pixels and its outer dimensions are 99x56 pixels. Here it is!

Find your material! - I recommend using websites like Tumblr and searching with the “GIF” filter only on, or alternatives such as Giphy or Tenor. Your browser may let you directly save the .gif file; if not and you are noticing it restricts you to save it as a .webp file you can try an extension like “Save webp as PNG or JPEG” (for Firefox but I image other browsers have similar functions, but I really recommend you switch to Firefox). To use this you will right click on your source .gif like normal but instead of clicking on “Save image as…” click “Save webP as…” and then click “GIF”. You should be redirected to the website ezgif.com where we will actually be doing all of our editing! Here’s the .gif we’ll be working with.

Convert to GIF (optional) - if you used the extension from the above step you should already be ready to click the blue “Convert to GIF” button. If not, go ahead and open ezgif.com and click on “webP” and then “WebP to GIF”; then convert to a gif with the blue button.

Resize the GIF - now that we have a gif ready to edit, let’s make it the right size. The easiest method I have found is to change it directly to the frame’s inner dimensions, 94x50 pixels. [EDIT: Make sure in the aspect ratio drop drop menu you select "stretch to fit" and not "center and crop to fit" like I did in the photo example.] Click “resize” and then type [94] in for the width and [50] for the height. Next press the blue “resize image” button.


Add the frame - next click “overlay” then click the thin blue button that says “Extend canvas size(use if overlay exceeds GIF sizes)”. This will give us some extra room to add the frame onto the design. Next click “Browse…” and find the frame you have saved onto your device, then click the blue “Upload image” button.


After that it’s going to be misaligned, that’s normal! It will say you have the option to drag it into place, but don’t bother. That’s one of the reasons my old stamps look wack, it’s just harder to do. Instead type [44] in for the Left box and [22] in for the Right box. It took me a while to figure out these dimensions to be honest, and I’ve only tested it with this frame so I don't know if it works with others. Then click the blue “Generate image” button.


Crop the transparent edges - click on “crop”. You will have the option to check a box that says “trim transparent pixels around the image” however, I don’t recommend this as it tends to crop a few of the frame’s pixels with it sometimes. Next, set the Left position to [44] and the Right position to [22]. For the other dimensions we will use the outer dimensions of the frame which are 99x56 pixels, this will trim everything except the tiny spaces in between the stamp frame’s spikes. Type the width as [99] and the height as [56] and click the tiny blue button that says “set”. After that click the blue “Crop image” button.


Save and use! - all that's left is to click “save” and upload the graphic to your liking. (best seen on dark mode obviously)

If you’d like to tag me in stamps you’ve made using my tutorial I would love to see them, but it’s not required!! Make sure to always give credit for pictures/gifs when you can and try not to make stuff out of personal/fan art. Thank you to the person in my inbox who requested this tutorial, I had been meaning to for a while but it was just the kick I needed. :)
#carrd graphics#carrd resources#carrd stuff#rentry graphics#rentry resources#rentry decor#rentry pixels#rentry stuff#rentry inspo#deviantart#neocities#mine#my graphics#my tutorials#resources#tutorials#tutorial#how to#stamps#blinkies#graphics#web graphic#old internet#early internet#spacehey#da stamps#page decor#custom#old web#frames
428 notes
·
View notes
Text
Simblr.cc - but better!
A lot has changed! Not only does it have a new lick of paint, it comes with way more features now!
Psst! If you are new to the site, please read this post first: Click me!
✨New Features
There are a lot of exciting new features:
An improved (Tumblr) importer.
A better Stories uploader.
A new lightweight uploader for quick, small posts.
A completely redesigned projects page with a fresh, modern look!
A redesign of the feed page + being able to like posts on said feed
You can now upload stories as "scenes" that appear on the feed, while still being part of a full, easily navigable story!
A new "Welcome" page, giving more people exposure to their stuff!
And... of course some bug fixes and teeny tiny User experience issues. 😉
🐦Lightweight Uploader
Something I'm super proud of putting together, the Lightweight uploader!
It streamlines the process of uploading simple pictures—no more navigating through multiple pages. Everything is on one easy-to-use page.
If you're logged in, you can access it directly from the Feed or via the "Upload/Post" option in the navbar.
Compatible Post Types:
WIPs
Gameplay
Personal
Lookbook
Familiar and Intuitive Features
If you're used to Tumblr's posting mechanism, you'll notice some recognizable elements:
Drag and Drop Images: Arrange your pictures to create collages! Each row holds up to 3 images, and you can add as many rows as you want.
Simpler Tagging: Tags are now easier to select.
Optional Titles and Descriptions: For WIPs and Personal Posts, titles and descriptions are optional. For other posts, they're still available but not required.
Streamlined and intuitive, the Lightweight Uploader makes sharing your content easier than ever!
📥 Improved Importer:
What's New?
New Importer: Pillowfort! We’ve added a brand-new import option: Pillowfort!
Tumblr Importer:
Previously, the Tumblr Importer relied heavily on your theme, which often caused errors if your theme wasn’t quite right. Fixing those errors was frustrating for both of us!
What’s changed? The importer now uses the official Tumblr API to grab your posts. This means imports will work flawlessly 99% of the time.
Plus, when you share a post on Simblr.cc, the importer will reblog it on Simblr.cc's Tumblr, giving you more exposure—that’s what Simblr.cc is all about!
What about past uploads?
I'm working to have the importer recognize whether your upload is CC or a Gameplay item (not live yet).
Support is being added to reblog posts from the old Tumblr Importer, so those uploads can still shine!
More import options are on the way in the future!
🖊 Improved Stories Uploader
Easier for Writers and readers! 😉
When creating a new story or legacy, you now have three options:
Chapter-Only Story
Chapters & Scenes Story
Scenes-Only Story
Important: All stories created before this update are currently set to Chapters-Only.
What’s the Difference Between a Chapter and a Scene?
Introducing Scenes! Previously, stories and legacies were strictly chapter-based, meaning you could only release a full chapter at a time. Now, with scenes, you have more flexibility!
A scene works like a storyteller’s post on Tumblr—it appears on your feed. This means your scenes can be shared on Simblr.cc’s Feed (but not the Stories browse page) even before the full chapter is published, making it easier for readers to discover your story.
Note: A "Scenes-Only" story works just like a "Chapters & Scenes" story—just without the chapters! 😉
Can I Change My Story Type?
You can change a Chapters-Only Story to a Chapters & Scenes Story. However, you cannot switch from Chapters-Only to Scenes-Only or any other combination.
Though, you will have to ask me to do this for you, due to the way it's currently set up.
Afterwords:
Note: Since this entire platform was built by just one person (me!), it might still have some bugs I haven’t come across yet. Please understand that most social media platforms have entire teams working on features like this, and therefore I can't promise a super "bug free" experience.
So, If you spot any bugs, please don’t hesitate to report them—it’ll help make the platform even better, and it also helps me out! Thanks for your support! 😊
#signal boost#ts2#sims 2#sims 2 download#sims 2 cc#sims2cc#ts2 download#ts3#ts2 cc#s3cc#the sims 3#ts3 cc#ts3 simblr#sims 3#ts4#sims community#simblr#sims#sims 4#the sims 4#ts4 simblr#the sims community#the sims 2#the sims#simblr: site update
443 notes
·
View notes
Text
A QUICK GUIDE TO AO3 CUSTOMIZATION FROM SOMEONE WHO KNOWS NOTHING ABOUT CODING

ft adding pink to everything and my secret to writing long comments
note: I originally posted this to twt but if that place burns in a fiery pit I spent too long on this for it to disappear, so I'm putting it here too :)
so many people know way more about this than I do, but this is a step-by-step walkthrough of the changes *I've* made, and hopefully it works as an introduction people can build from for whatever they'd like to do
There are a lot of images in this post! (click to enlarge)
to start, AO3 skins
site skins change how the AO3 website appears when logged in (even on mobile), mine is pink and blue!

I'll have my skin turned off throughout the post so the guides appear as they will for you
to create, edit, and view skins, go to the "skins" tab from the left-hand menu. you can also view public site skins from there or from the button in the preferences.


public site skins are made by other users. i would really encourage previewing and exploring them to become familiar with the possibilities (maybe you just want to use one of them and now you're done!)
to create your own skin
on the skins page, click "create site skin"
if you don't know CSS (same), use the wizard! clicking on the "?" will give more information about each option
I only use the colours section you'll see a link right there for hex codes I use pink as a header colour and bue for accent but lots of people change the background colour and that looks really cool!
submit


The next step (optional!!!) is to add CSS from a public skin to your own. I use "ByLine" by Branch. this separates the tag categories and adds spacing to make them easier to read.
here is a before and after using the fic "Landslide" by @roosterbruiser as an example


to see the CSS of a skin, click the title
copy all the text below the CSS heading
in the skin creator/editor press the custom CSS option and paste all the text into the CSS box


you can have both wizard and custom CSS settings, in mine you can see the header and accent colours as well as the CSS

level up: USERSCRIPTS
userscripts are small pieces of code that modify a website. for AO3, this may involve adding shortcuts and buttons or even advanced tagging functions (computer people, I'm so sorry if this is wrong, I'm trying). I use Greasy Fork and Tampermonkey.
This is how I write long and formatted comments!
Greasy Fork is an archive of userscripts and Tampermonkey is a browser extension and userscript manager. You don't need to use these two in particular. please use your common sense when downloading anything or adding permissions to your browser.
Greasy Fork guide on installing scripts
Install Tampermonkey on Chrome
there are TONS of user scripts for AO3. This is another good opportunity to explore all the possibilities. there are lots of more complicated options I haven't explored.
scripts for AO3

i use this floaty review box
and this comment formatting
EDIT: if you use chrome you might need to turn on developer mode in your chrome extension manager - you can google "tampermonkey developer mode" and it should explain that :)
to install (once you have Tampermonkey installed):
open the script you want in Greasy Fork and press install
Tampermonkey will open, press install again


clicking the Tampermonkey extension will let you toggle scripts on and off, and opening the dashboard will let you view, edit, and delete scripts


i find i can only have a few turned on at a time before they cancel each other out, but that depends on which ones you're using and someone more savvy might be able to fix that
how to use the floaty review box - write more comments!
there will now be a "floaty review box" button at the top of the work, it will open a floating text box you can move anywhere on the page. highlighting any text and pressing the insert button will paste the text with italics into the box


anything you type in the review box will appear in your comment at the bottom of the page!
if you have also installed the comment formatting script, you'll be able to highlight any text in your comment and use the new buttons above the comment box to format it

thats all ive got! Hopefully this is a good starting point to get familiar with some of the terms and basics for skins and scripts <3
if you want some inspo for how to comment on fics i made a whole fic rec list on twitter based on comments I've left, it's here. i have a masterlist of recs there mostly for darklina/reylo and similar ships.
the tag #reading with ru has cod recs and me talking about books
:)
#please no one follow me from this im never helpful otherwise#ao3 skins#ao3#fanfic#ao3 community#fandom#ao3 resources#im sorry if the image quality is awful lmk if I should clarify any of the text!#floating comment box#floating review box#ao3 guide
772 notes
·
View notes
Text


Shop Sign Wall Lights - UPDATED 15 May 2025
I put together a few sets of shop sign wall lights. But there are instructions. I kept some swatches as a default white color so that you could pick which color you want the light to be while in live mode. This saved on the file size of the package file because the more textures a file has, the more bloated the file size is.
I had some fun with some shop names although I mainly included generic titles in both English and Simlish.
DOWNLOAD for FREE: SFS
OR at Patreon*
*You must be over 18 to access my Patreon page.
INSTRUCTIONS ON CHANGING LIGHT COLORS
Once you place the light in build mode, then go to live mode. Click on the light and you will get the following pie menu.

Select SET COLOR AND INTENSITY and then choose THIS LIGHT. The color options will then appear so you can select which color you want.

If you use the name signs along with the Awning Lights, make sure to place the name on top of the awning so when you select the color picker, the correct sign changes colors. The other option is to place the name separate from the awning, go to live mode and change the color, then go back to build mode and add the awning light you want.
Enable the bb.moveobjects on cheat and then you can make adjustments to location and size of objects. You can adjust the position of the light on the wall by depressing the Alt key while placing the sign (on PC). You can adjust the size of the item by depressing the Shift key and either [ (for smaller) or ] (for bigger) (on PC).
CREDITS
Awning Shop Lights - 19 swatches of various awning wall lights. 18 are pre-colored and one is white so you can change the color yourself in game.
Candy Shop Lights - 20 swatches
Pottery Shop Lights - 25 swatches
Tattoo Shop Lights - 21 swatches
Enjoy!
Creations by SexyIrish7
These cc objects are new 3d meshes created using Blender and Sims 4 Studio.
Polygon Count: 6
All CC have:
*Ability to search catalog using search terms: sexyirish7 and si7
*Customized thumbnail
*******
CREDITS:
Software credits:
Sims 4 Studio v. 3.2.4.1 (Star): https://sims4studio.com
Blender 4.0: https://www.blender.org/download/
GIMP v. 2.10.34: https://www.gimp.org/
Inkscape v. 1.2: https://inkscape.org/
Thank you to the creators and moderators producing tutorials and answering questions!
*******
Model and Image credits:
Mesh created by me.
Simlish font credit to Franzilla: https://modthesims.info/
Image credits:
Awning Lights Image credits: Modified image from Adobe Stock
Candy Shop Image credits:
Swatches 1-3: Image by pch.vector on Freepik https://www.freepik.com/free-vector/christmas-candies-symbols-set-neon-style_11241813.htm#fromView=search&page=1&position=26&uuid=8b541325-0e62-4e37-9468-6bacd30f8963&query=neon+lollipop+candy
Swatches 4-8: Image by gstudioimagen on Freepik https://www.freepik.com/free-vector/sweet-candy-neon-seamless-pattern_5595774.htm#fromView=search&page=2&position=30&uuid=e2259de5-014d-4d04-af87-1198ee0f35e2&query=%40gstudioimagen+neon
https://www.freepik.com/free-vector/sweet-candy-neon-seamless-pattern_5595775.htm#fromView=search&page=1&position=27&uuid=e2259de5-014d-4d04-af87-1198ee0f35e2&query=%40gstudioimagen+neon
Swatches 9-10: Image by openclipart.org https://all-free-download.com/free-vector/download/peppermint_candy_clip_art_13182.html
https://all-free-download.com/free-vector/download/round_candy_with_stick_card_on_pink_background_6823183.html
Swatch 11: Image by All-free-download.com https://all-free-download.com/free-vector/download/round_candy_with_stick_card_on_pink_background_6823183.html
Swatches 12: Image by katemangostar on Freepik https://www.freepik.com/free-vector/ice-cream-cart-neon-sign_3238564.htm#fromView=search&page=8&position=42&uuid=2f82b4d1-5ca8-449c-ae22-4573861ebcb0&query=neon+sign+retail
Pottery Shop Image credits:
Swatch 1: Crafting icons created by andinur - Flaticon https://www.flaticon.com/free-icon/pottery_17392031
Swatch 2: Image by katemangostar via Freepik https://www.freepik.com/free-vector/aquarius-neon-sign_5561944.htm#fromView=search&page=2&position=5&uuid=c55e5e21-0550-46f0-b9be-cfa85ff38796&query=Ceramic+Neon
Swatch 3-4: Pottery icons created by Smashicons - Flaticon https://www.flaticon.com/free-icon/vase_3760867
https://www.flaticon.com/free-icon/vase_3760970
Swatch 5: Icon by istar_design_bureau via Freepik https://www.freepik.com/icon/pottery_1958438#fromView=search&page=2&position=20&uuid=096084ae-13fe-429c-a419-e6e13ccd37b9
Swatch 6:Icons by Eucalyp - Flaticon https://www.flaticon.com/free-icon/pottery_6552610
Swatch 7: Icon by berkahicon via Freepik https://www.freepik.com/icon/spin_13785816#fromView=search&page=2&position=0&uuid=096084ae-13fe-429c-a419-e6e13ccd37b9
Swatches 8-11: Icons by Freepik https://www.freepik.com/icon/pottery_8540816#fromView=search&page=3&position=43&uuid=096084ae-13fe-429c-a419-e6e13ccd37b9
https://www.flaticon.com/free-icon/machine_9200546
https://www.flaticon.com/free-icon/vase_8838322
https://www.flaticon.com/free-icon/pottery_3305262
Tattoo Shop Image credits:
Swatch 1: Modified Image by katemangostar on Freepik https://www.freepik.com/free-vector/tattoo-salon-neon-text-with-tattoo-machine-neon-sign-night-bright-advertisement_2438198.htm?log-in=email
Swatch 2: Image by Nippy Custom https://www.nippycustom.com/products/tattoo-neon-sign
Swatches 3-5: Image by bohlam via Vecteezy https://www.vecteezy.com/vector-art/2185717-tattoo-studio-neon-signs-style-text-vector
https://www.vecteezy.com/vector-art/34210463-neon-sign-tattoo-studio-with-brick-wall-background-vector
*******
TOU:
Do not re-upload and claim as your own
Do not re-upload and hide behind a paywall
*******
Changelog:
15.05.2025
*Updated swatches for compatibility with slotted signs.
*Added wall deco slot so that signs can be stacked on slotted signs for Awning Signs
*Added swatches with inverted images for Candy, Pottery, and Tattoo Shop Signs.
#the sims 4 cc#ts4cc#sims 4 cc#the sims 4#wall decor#sims 4#ts4#lights#wall lights#signs#shop signs#retail#pottery#ceramics#tattoo#ink#candy#lollipop#sweets#sugar#light tutorial#sexyirish7#updated cc#featured
305 notes
·
View notes
Note
hi!! do you have any advice on how to finish projects faster? or at least more efficiently? i take a few days to finish a piece (1 or 2 days at minimum) and i want to learn how to refine my process
that can depend a lot on what kind of look you’re trying to achieve, and what exactly is slowing you down!
things you can do if you take too long doing lineart:
Practice sketching in pen & marker! Do exercises that train your hand to be more efficient. If you can draw the same thing with 5 lines that previously took you 20, you’ll cut down on time.
Try a different brush! Maybe the one you’re using is too soft, and you have to keep going back over the lines to make them dark enough. There might be another brush that gets the same result with less effort.
Zoom out! On paper, a drawing that’s 2 inches tall will take wayyyy less time than a drawing that’s as big as your torso. When you zoom in, you’re essentially making the whole drawing bigger. When I draw, I like to be able to see the whole pose. If you’re worried about it not being perfectly clean, I promise you, no one is paying that close attention.
Skip the lineart entirely! Odds are, your sketches might already be pretty clean. If it takes you 20 minutes to do a sketch and 2 hours to do the lineart, but the lines look almost the same, then why bother doing the lineart?
similar advice for coloring/rendering!
Maybe it’s your art software! I can color 10x faster in CSP than anything else, because CSP makes it really easy to color in flats.
Limit how many types of brushes you use. There ARE certain effects (like convincing digital watercolor) that really do need 5-10 different brushes to get the look Just Right, but going through your tool menus to swap brushes will add time. When I render (which is rare, honestly) I stick to one, maybe two painterly brushes.
other general advice:
Don’t be so hard on yourself! Honestly, 1-2 days is still objectively pretty fast!
If you’re a perfectionist who will arbitrarily spend too much time fiddling and fiddling until it’s justttttt right, try setting timers! Give yourself a predetermined amount of time for the lineart, for the coloring, for the rendering, etc and MOVE ON once that timer goes off. Not everything you do has to be your magnum opus.
Use keyboard shortcuts!!!!!!!! I don’t like using screen tablets, especially if I can’t use shortcuts. If you have a tablet with programmable buttons or some kind of remote, that can work too. I see people use bluetooth xbox controllers sometimes, which is a good option if you already have that. Personally, I use so many shortcuts that there are never enough buttons to program, so I just stick with a keyboard.
JUST KEEP AT IT! The more you draw, the faster you get. I avoided doing paneled comics for nearly 10 years cause they took so much effort, and would only do comics where each panel was its own layer/image. After enough time doing that, I eventually got good enough at everything else to do with comics that the paneling aspect wasn’t that difficult anymore.
294 notes
·
View notes
Text
OK since I haven't seen too many people talk about this since twitter news usually strikes pretty fast over here whenever e'usk does anything ever, let me give ya'll the run down on two things that will go live on NOVEMBER 15TH and why people are mass migrating to Blue Sky once more; and provide resources to help protect your art and make the transition to Blue Sky easier if you so choose:
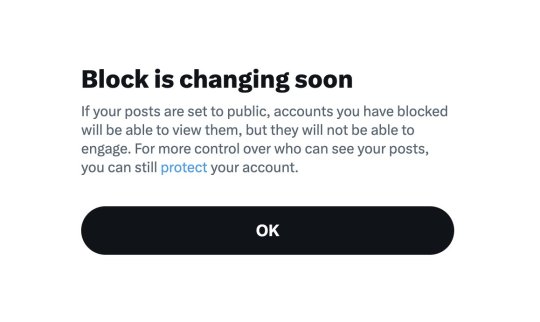
The Block function no longer blocks people as intended. It now basically acts as a glorified Mute button. Even when you block someone, they can still see your posts, but they can't engage in them. If your account is a Public one and not a Private one, people you blocked will see your posts.

They say because people can easily "share and hide harmful or private information about those they've blocked," they changed it this way for "greater transparency." When in reality, this is an extremely dangerous change, as the whole point of blocking is to cease interaction with people entirely for a plethora of reasons, i.e. stalking, harassment, spam, endangerment, or just plainly annoying and not wanting to see said tweets/accounts. or you know, for 18+ accounts who do not want minors interacting with them or their material at all (There is speculation saying these changes are specifically for Elon himself so he can do his own kind of stalking, and honestly, with the private likes change, it lowkey checks out in my opinion)
Also, this straight up goes against and may violate Apple and Google's app store policies and also is straight up illegal in Canada and probably other countries as well.
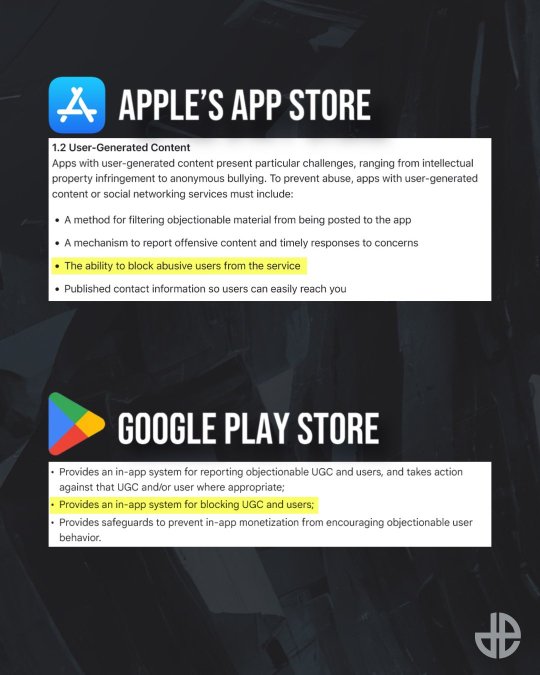
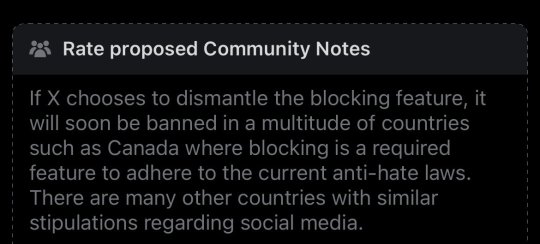
If this ACTUALLY goes through, twitter will only be available in select countries, probably exclusively in the US, which would collapse the site with the lost of users and stock, and probably be the last push it needs to kill the site. And if not, will be a very sad and exclusive platform made for specific kinds of people who line up with musk's line of thinking.
2. New policies regarding Grok AI and basically removing the option to opt out of Grok's information gathering to improve their software.

And anything you upload/post on the site is considered "fair game" with "royalty-free licenses" and they can do whatever they please with it. Primarily using any and all posts on twitter to train their Grok AI. A few months ago, there was a setting you can opt out of so they couldn't take anything you post to "improve" Grok, but I guess because so many people were opting out, they decided to make it mandatory as part of the policy change (This is mainly speculation from what I hear).
So this is considered the final straw for a LOT of people, especially artists who have been gripping on to twitter for as long as they can, but the AI nonsense is too much for people now, including myself. Lot's of people are moving to Blue Sky for good reason, and from personal experience, it is literally 10x better than twitter ever was, even before elon took over. There is no algorithm on there, and you can save "feeds" to your timeline to have a catered timelines to hop between if your looking for something specific like furry art or game dev stuff. It's taken them a bit to get off the ground and add much needed features, but it's genuinely so much better now
RESOURCES
Project Glaze & Cara
If you're an artist who's still on twitter or trying to ride it out for as long as you can for whatever reason you have, do yourself a favor and Glaze and/or Nightshade your work. Project Glaze is a free program designed to protect your art work from getting scrapped by AI machines. Glazing basically makes it harder to adapt and copy artwork that AI programs try to scan, while Nightshade basically "poisons" works to make AI libraries much more unstable and generate images completely off the mark. (These are layman's terms I'm using here, but follow the link to get more information)
The only problem with these programs is that they can be resource intensive for computers, and not every pc can run glaze. It's basically like rendering a frame/animation, you gotta let your pc sit there to get it glazed/nightshade, and depending on the intensity and power of your pc, this may take minutes to hours depending on how much you wanna protect your work.
HOWEVER, there are two alternatives, WebGlaze and Cara
WebGlaze is an in browser version of the program, so your pc doesn't have to do the heavy lifting. You do need to have an account with Glaze and be invited to use the program (I have not done so personally so I don't know much about the process.)
Cara is an artist focused site that doubles as both a portfolio site and a general social media platform. They've partnered with Glaze and have their own browser glazing called "Cara Glaze," and highly encourage users to post their work Glazed and are extremely anti-ai. You do get limited uses per day to glaze your work, so if you plan on doing a huge backlog uploading of your art, it may take awhile if your using just Cara Glaze.
Some twitter users have suggested glazing your art, cropping it, and overlaying it with a frame telling people to follow them elsewhere like on Bluesky. Here's a template someone provided if you wanna use this one or make your own.

Blue Sky Resources and Tips
So if your a twitter user and your about to realize the hellish task of refollowing a massive chunk of people you follow, have no fear, there's an extension called Sky Follower Bridge (Firefox & Chrome links). This is a very basic extension that makes it really easy to find people on Bluesky

It sorts them out by trying to find matching usernames, usernames in descriptions, or by screen name. It's not 100% perfect, there's a couple people I already follow on Blue Sky but the extension could not find them on twitter correctly, but I still found a huge chunk of people. Also if your worried that this extension is "iffy," they do have a github open with the source publicly available and the Blue Sky Team themselves have promoted the extension in their recent posts while welcoming new users to the platform.
FEEDS and LABELS
OK SO THE COOLEST PART ABOUT BLUESKY IS THE FEEDS SYSTEM. Basically if you've made a twitter list before, it's like that, but way more customizable and caters to specific types of posts/topics. Consolidating them into a timeline/feed that exclusively filled about those particular topics, or just people in general. There's thousands to pick and choose from!


Here's a couple of mine that I have saved and ready (down below). Some feeds I have saved so I can jump to seeing what my friends and mutuals are up to, and see their posts specifically so it doesn't get lost in reposts or other accounts, and also specialized feeds for browsing artists within the furry community.


The Furry Community feeds I have here were created by people who've built an algorithm to place any #furry or #furryart or other special tags like #Furrystreamer or #furrydev. They even have one for commissions, and yes you can say commissions on a post and not have it destroyed or shadow banned. You are safe.
If you want, and I highly recommend it to get visibility and check out a neat community, follow furryli.st to get added to their list and feeds. Once your on the list, even without a hashtag, you'll still pop up in their specialized feeds as just a member of the community there. There are plenty of other feeds out there besides this one, but I feel like a lot of people could use one like this. They even got ones for OC specific too I remember seeing somewhere.

And in terms of labels, they can be either ways to help label yourself with specific things or have user created accessibility settings to help better control your experience on Blue Sky.


And my personal favorite: Ai Imagery Labeler. Removes any AI stuff or hides it to the best of it's abilities, and it does a pretty good job, I have not seen anything AI related since subscribing to it.
Finally, HASHTAGS WORK & No need to censor yourself!
This is NOT like twitter or any other big named social media site AT ALL, so you don't have to work around words to get your stuff out there and be seen. There are literally feeds built around having commissions getting and art seen! Some people worry about bots and that has been a recent issue since a lot of people are migrating to Blue Sky, but it comes with any social media territory.
ALSO COOL PART,
you can search a hashtag on someone's profile and search exclusively on that profile as well! You can even put the hashtag in bio for easy access if you have a specialize tag like here on tumblr. OR EVEN BUILD YOUR OWN ART FEED FOR YOUR STUFF SPECIFICALLY!

So yeah, there's your quick run down about twitter's current burning building, how to protect your art, and what to do when you move to Blue Sky! Have fun!
#Twitter#Blue Sky#BlueSky#Cara#Project Glaze#Glazed Art#NightShade#Twitter Update#cara artists#art resource#resource#Online resource
717 notes
·
View notes